Update: TNG V2 is now available. For useful concise Mac/Linux terminal commands and more for beginners including Vim, please visit Commands.
I am hoping to share VIM in a new light, with additions or compilations of fitting customizations and plugins, particularly for the purpose of note-taking and writing. Terminal editors remain one of the most powerful ways for word processing and programming in my humble opinion. Vim is lightweight and customizable. Vi/Vim is also commonly available on Linux, even on legacy UNIX servers.
Basic steps to start and use Vim for note-taking and writing:
Launch or install VIM
Practice commands
Vundle (Plugins Manager)
Goyo
Airline and Startify (optional)
Color schemes (optional)
Emmet, Jedi, NERDTree (optional)
** These steps are designed (hopefully) for customized comfort or basic usefulness yet prettified appearance in vim writing.
Bear in mind I am in no way a Vi/Vim expert, but I have spent hours testing and configuring to determine what works or not so I hope this post can assist and propel others further ahead of me in learning the basics and kickstart their terminal editor experience for note-taking and writing. I have created a TNG (TakeNotesGuide) V2 theme (customized vim environment with lines comments for explanation) for your quick and personal use in note-taking and writing.
TNG (TakeNotesGuide) customized theme for quick and sleek note-taking and writing
Vi/Vim comes built-in with most systems I know (except Windows). To install VIM, please download it from here. After installation and if typing vim at terminal prompt does not launch it, one can look for it for example in /usr/bin and append a new working export PATH line into ~/.bash_profile. We can now type vim to launch from any terminal directory then. Edit this file from your home directory (~):.bash_profile by adding this line:
export PATH=”${PATH}:/usr/bin/”
(You may have to change the path to where your VIM is installed)
Tip:
Vim scripts are written in Vim script language. Developers and intermediate or advanced users may learn the language directly from vim itself with :help vim-script-intro
Practice commands
From the terminal command prompt type vimtutor (Tutor for learning VIM in about 8 chapters) and enter to start learning with practice. Alternatively, start Vim and practice with the below basic notes I have extracted based on what I thought is more useful. More tips:
Type vim . will launch vim with a directory tree listing that one can browse and open files for editing
Comments in .vimrc start with the ” character
:setfiletype followed by a space and Ctrl-d will reveal the filetypes that vim supports
:help quickref will launch VIM quick reference with more on VIM for advanced users and those seeking more comprehensive information. One of the strengths of vim is the help documentation in vim being extensive, so please remember to make good use of the free resource with :help _____
$vimtutor fr and $vimtutor gr will launch french and german versions respectively from the terminal command prompt.
Basic notes on vim basic usage
There are some basic modes in vim, including Normal (Text manipulation and navigation), Insert (Editor), Visual (For selected text), and Command (For the execution of commands) modes. We can manipulate the document in Normal mode, but we can do the same in Editor mode just as normal word processing. Therefore, those who just wish to start using VIM for document editing without learning too much about it can just type $vim FILENAME from the correct directory in the terminal prompt, type ‘i’ to start editing as per normal, and :wq to save and quit. Below are some commands I learned that should be more useful. Bolded ones are emphasized for more practical importance.
Vim starts in Normal mode
ESC will return to Normal mode
Ctrl+w, then press v will create a new vertical window, or s for a horizontal window
Ctrl+w twice to switch between the windows
h,j,k,l, arrow keys, and PgUp & PgDn to move around
$ means the end of line
w means move to next word. Vim shortcuts can be intuitive. That means 3w will move to the third word
x will delete the letter
dd will delete the whole line; 2dd for 2 lines
d + arrow keys for deletions
0 to move the cursor to start of a line
e to move the cursor to end of current or next word
u to undo
Shift-g will go to end of the document
gg to go to the start of the current file and then a line number (specified near screen bottom e.g. 30) and enter for the cursor to go. Or type the line number and Shift-g
Type / followed by a search term, enter and n or N to move around. Insert \ before / to escape it if your search string contains / or it will not work
For programmers: Teleport between matching parentheses with ‘%‘
ma to create a bookmark with the name ‘a’ at current cursor location and return to this location by typing `a. This can be useful when working on large files that needs multiple frequent access at certain locations
Visual mode
Type v to enter visual mode to start highlighting text (:’<,’>w new_file to save into a new file)
Type y to copy
c to cut
p (in normal mode) to put or paste
Insert mode
Type i from Normal mode enter editor mode to start editing the document
Type o to start editing at new line below. O to start editing at new line above current position.
ESC will return to Normal Mode
Command mode with ‘:’
:q! will quit without saving and :qa! will quit all buffers to close VIM.
:w Filename will create a new non-existing file
:saveasfilename will save to a new file
:wq will write and quit
:%s/old/new/gc to change all old occurrences to new. ‘g’ instead of ‘gc’ to skip the confirmation
:! followed by external commands for execution e.g. ls or pwd
:set ic will ignore cases in searches
:nohlsearch will remove all search highlights. :hls will show again.
For programmers, this will execute a python file :!python test.py
: and Ctrl-d will reveal possible commands
Tab to show next possible commands and help complete commands
:e and space, then (Ctrl-d to view files) filename to open or Tab for available selections
:w !pbcopy and enter for selected text in visual mode will copy the text in a buffer that can be pasted in Mac desktop applications with Cmd+v
ESC will cancel or return to normal mode
Tips:
F1 will show help
$vim . (vim with a dot from the terminal prompt) will launch a directory tree listings for easy browsing and file open.
$vim filename to create new or edit file
Press : and the up arrow will access your last commands and history, this can be very useful to avoid repetitions
More tips:
If you wish to learn Vim basics at a more casual pace or in shorter sessions or in a video teaching format, please consider Vim essentials Udemy course (This course is free the last checked).
Another user-friendly online resource to learn basic Vim commands interactively is Open Vim.
Install Vundle (Plugins Manager)
Vim users need to figure out how plugins work to customize and add functionalities to VIM according to our needs. Vundle (please install according to the guide) is a good plugins manager that enables users to just insert and save at least one line (according to the requirements of that plugin) into .vimrc file, quit and restart VIM and :PluginInstall to install a plugin.
Basically, we have to execute the below line from the terminal prompt and copy the recommended .vimrc settings from Vundle Github (or just use TNG .vimrc)
Are you wondering what plugins are available for installation? Vimawsome has a repository of plugins with users’ votes for your perusal. Beginners may do well to select only plugins with a high and inordinate amount of votes; Not all plugins are equal in terms of quality and deliverance.
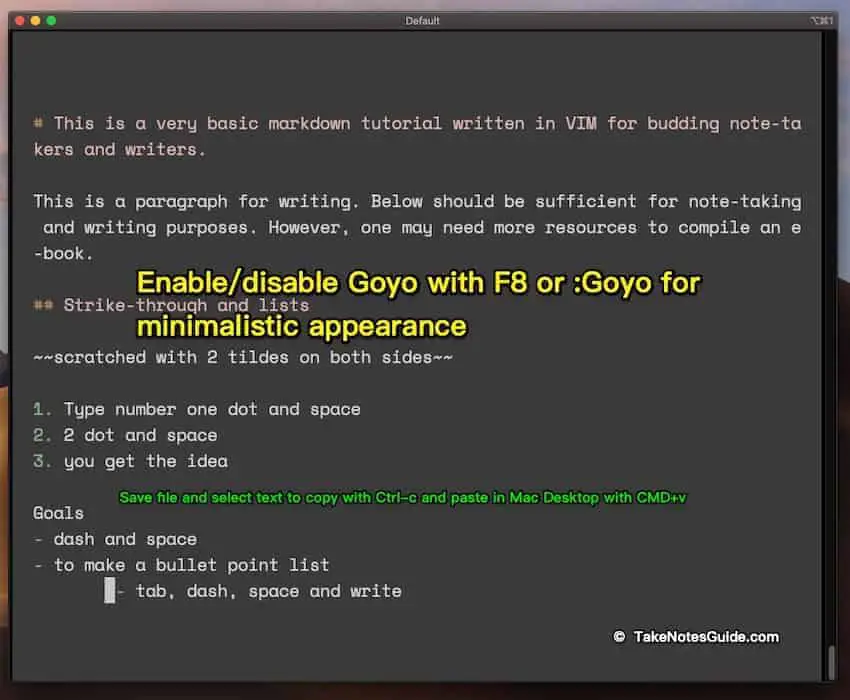
Goyo
Toggle Goyo with :Goyo or F8 in TNG theme
Looking for a good plugin for minimalistic writing and reading in vim? Goyo (on Vimawesome) is excellent in setting up a distraction-free reading and writing vim environment. The design is so simplistic with ample neat margin space; Goyo is uncluttered for creativity and inspires freedom of artistic expression.
You may notice the document top and side are comfortably spaced for readability. There are options for resizing but I found the default to be good. Just save this line into a new or use this .vimrc file, before restarting, run :PluginInstall and restart again:
Plugin ‘junegunn/goyo.vim’
To easily use Goyo, just toggle on or off with this command:
:Goyo
Below line in .vimrc file will easily activate or deactivate Goyo with F8:
map <F8> :Goyo<cr>
To launch Goyo with vim startup, insert or enable these into the .vimrc file:
“Launch Goyo at startup (This is a comment starting with a “)
autocmd vimenter * Goyo
Tips:
For writers in vim: Counting of words, characters, lines, cursor position, and bytes can be displayed by typing g and followed by Ctrl-g (A built-in vim function). This is a convenient way of displaying word count information for seconds without the airline status bar.
Pre-selection of words with ‘v‘ and mouse for counting is also supported.
Goyo mode will (understandably so) disable Airline status bar which includes word counts and line information.
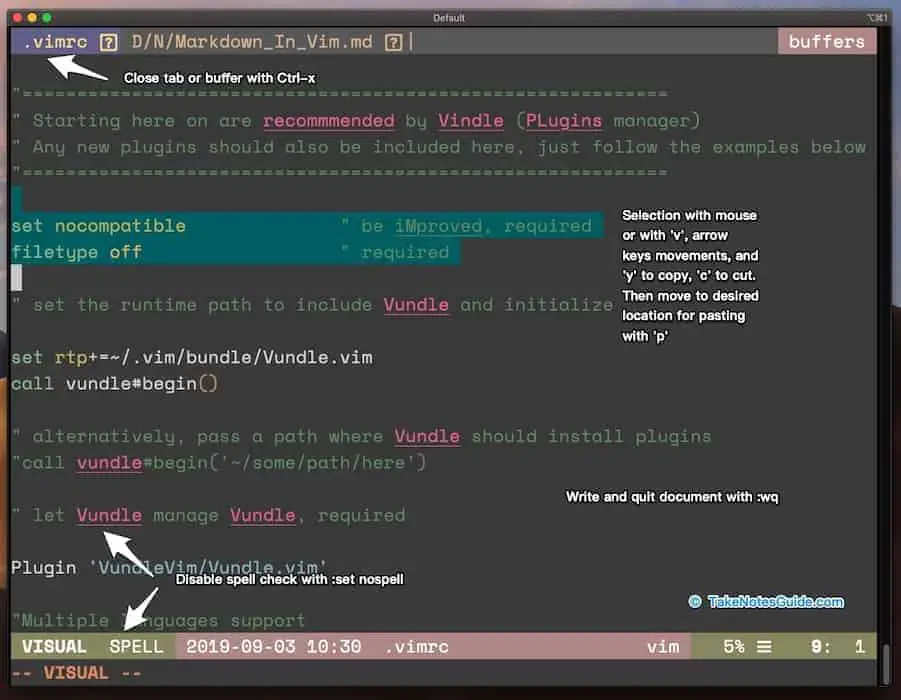
Spellcheck is enabled in TNG theme. Type :set nospell to turn it off until vim restart.
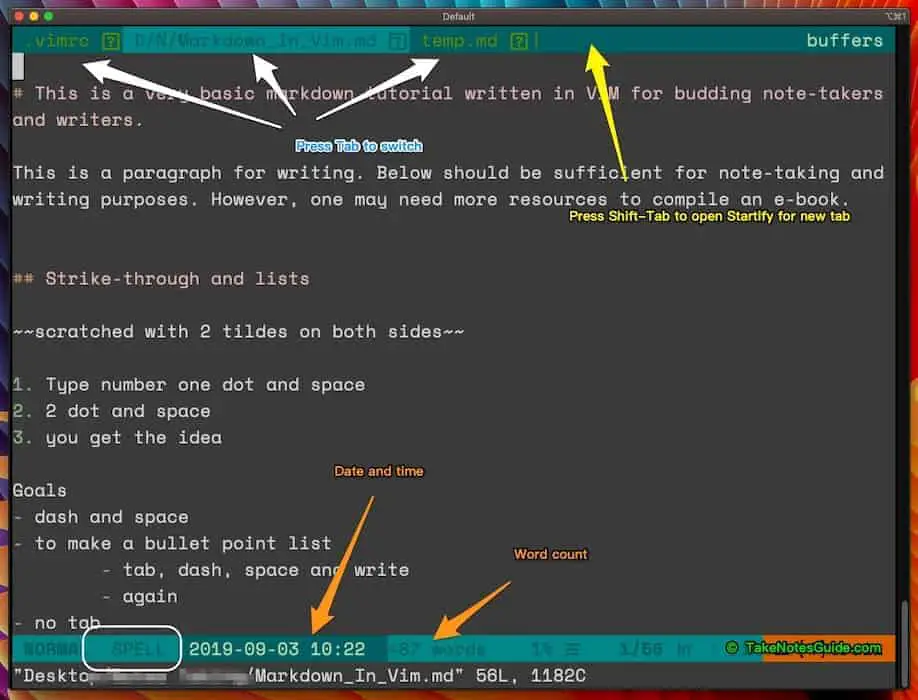
Airline
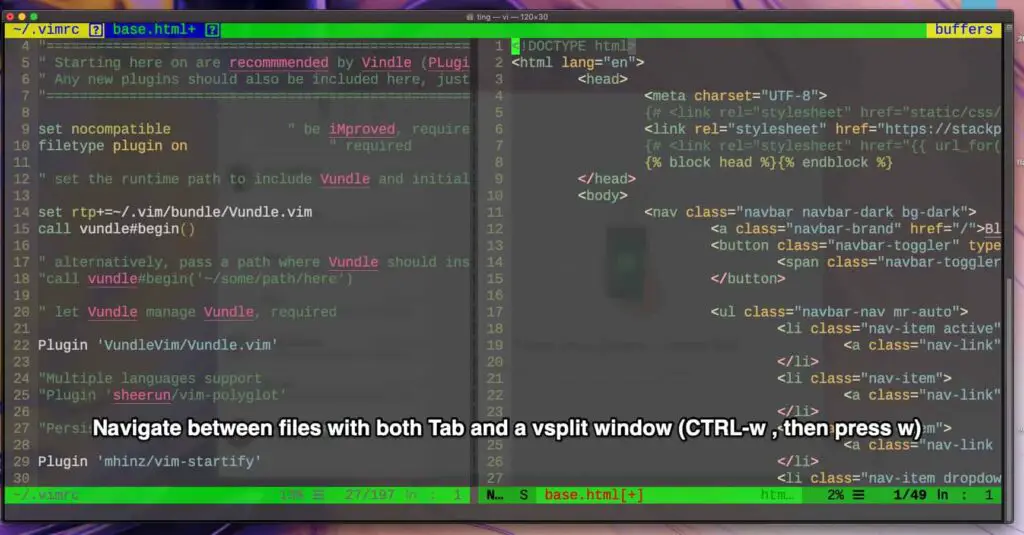
Airline status bar and tab buffers
Airline is the status bar that shows information (or beyond) about the document we are working on. For example, word counts and line numbers are displayed.
Airline buffer tabs
Buffers (or files loaded in memory for editing, much like the different hidden windows behind the current one or the tabs on physical file pages) are useful when you work on multiple files and numerous split windows are not helpful.
With these lines in a .vimrc file, we can traverse the tabs easily with the Tab (go to next tab) key or Shift-Tab (to open Startify to quickly choose recent files in new tab) and Ctrl-x to quit or close that tab (modified, gratitude and you can read more in this post):
:nnoremap <Tab> :bnext<CR>
:nnoremap <S-Tab> :Startify<CR>
:nnoremap <C-X> :bdelete<CR>
Tips:
Airline does not work in minimalistic Goyo mode
Adjusting the width of the terminal window with click-and-drag can change the airline display
Play around with different airline theme with :AirlineTheme random (added to TNG)
View existing open buffers in vim with :buffers
Add a new buffer manually with :badd filename (Shift-Tab or :Startify is easier from TNG)
One can still browse the directory with command :e, space and a dot from vim
I have modified the airline to include date and time with this line in TNG: let g:airline_section_b = ‘%{strftime(“%F %H:%M”)}’
Miscellaneous commands
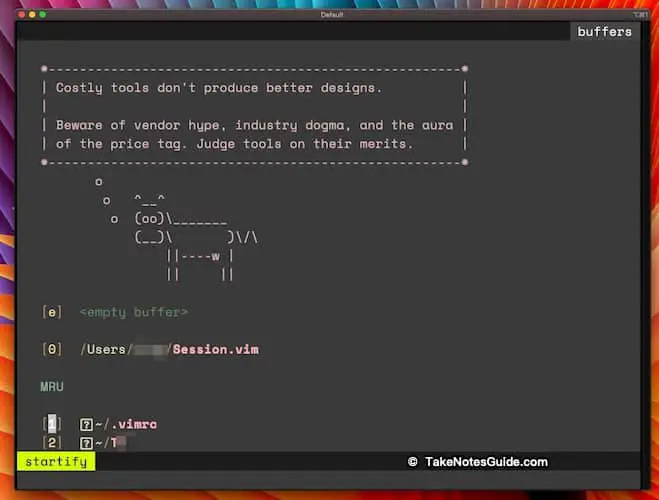
Startify
More on Startify
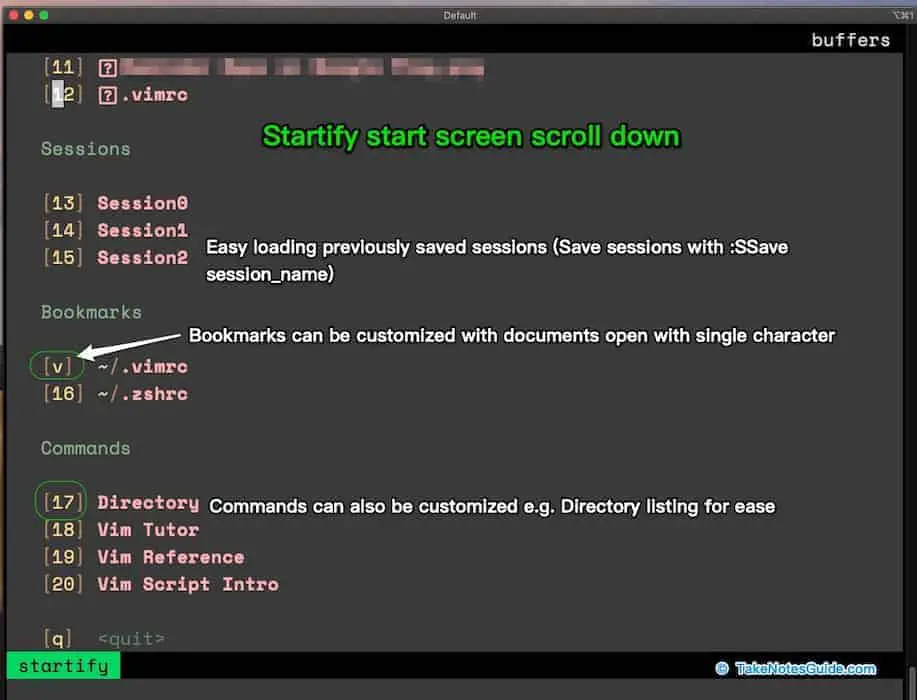
Have you ever wondered how you can save time from remembering and typing repeatedly to open your last recent files? Startify (on Github) solves that easily with just one plugin without the need for complicated steps e.g. re-compile source codes just to load the last saved session. All you need to do is to select from the start list of files by typing the number or click to open. If you wish to open this list again for selection, just type :Startify and enter. Plus the user-friendly interface should appeal to vim beginners, creative writers, and art students alike.
The default should be sufficient for basic usage, but for the curious, there are more optional settings to customize our Startify start screen in the .vimrc file, such as bookmarks and commands as well. For example, to assign a character ‘v’ to bookmark the .vimrc file or just include the filename for auto-number assignment:
let g:startify_bookmarks = [ {‘v’: ‘~/.vimrc’}, ‘~/.zshrc’ ]
To assign commands with names, just follow the format below each line for one command:
The above commands include one for launching a directory listing with ease from a number selection in Startify. Can you identify it?
Startify bookmarks can be very useful to launch familiar files by just typing an assigned alphabet as shown above.
Please note the default Session 0 may not work before re-compiling the source codes. A work-a-round may be to save into a new session manually with :SSave Session_name. Upon vim startup, load the same session from Startify session section selection or with :SLoad Session_name.
Color schemes
How to change and set a color scheme for vim?
In VIM, type :colorscheme followed with space and CTRL-d to view what color schemes are available for command completion. This setting will last for the current session. To set a persistent color scheme for future sessions, add this line into the ~/.vimrc file:
colorscheme murphy
(Replace murphy with any other existing or installed color schemes via plugin e.g. Iceberg). You may need to also add this line to the same .vimrc file to view syntax colors:
syntax on
Note: I have tested some color schemes. These should be fine for basic writing e.g. Seoul256, Default, Iceberg and murphy (in order of preference).
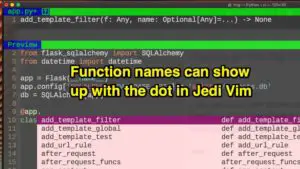
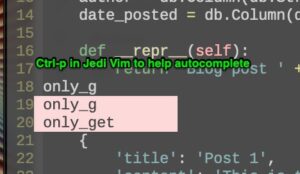
With Jedi-Vim, one can code with better ease in i.e. Python. Once in a .py file, available methods/functions will be displayed with just the dot (.) sign for selection. Type an incomplete function name and type Ctrl-p to help complete it. Ctrl-p may be pressed a few more times. Another command that may come in handy is to press \n at the current word and all instances will be highlighted. Also, jumping around or looking up functions maybe just a \g or \d away. Remember, Ctrl-x to close the current window.
Jedi Vim Dot ExampleJedi Vim Autocomplete ExampleJedi Vim Autocomplete Example 2
Note: Jedi’s official documentation recommends Ctrl-space. That conflicts with my MacOS language input, but Ctrl-p works for now.
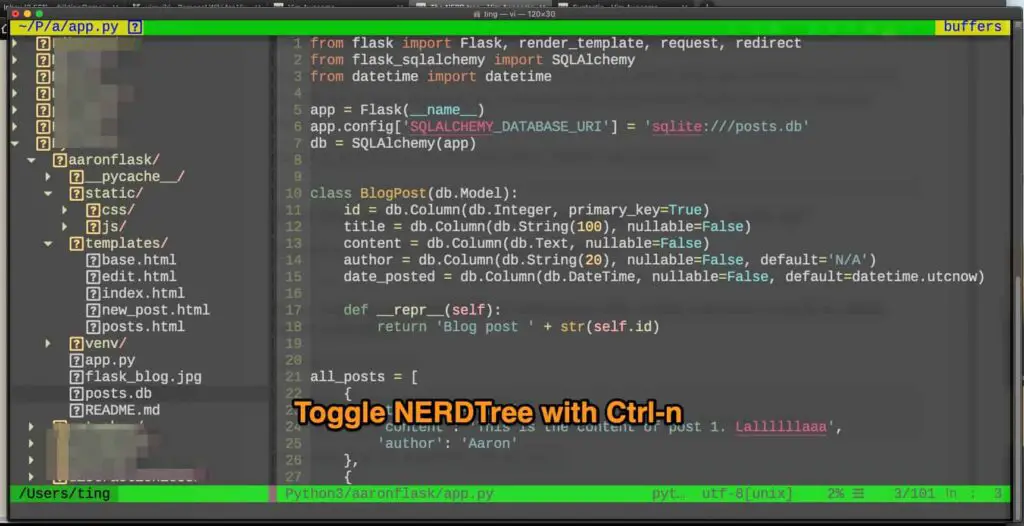
This feature will show the directory tree on the left while a file can be displayed on the right. In the TNG V2 theme, this feature can easily be toggled with Ctrl-n. Navigate between the 2 window panes with Ctrl-w and then w or with the mouse.
NERDTree example
How to enable mouse clicks and selections in Vim?
Add this line into the .vimrc file:
set mouse=a
(Tested working in Mac iTerm2)
How to enlarge words in Vim?
CMD+ (press CMD first without releasing and then the key with + on it without the shift) and CMD- to increase and decrease font sizes. CMD0 will return to the original size. Again, this is tested working in Mac iTerm2.
How to vertically split and resize window size in Vim?
For example, one may open files with Shift-TAB in Startify and move around different files with Tab, and split the current window size into 2 with :vsplit filename(optional) and keep one window static. In this case, switch between the split windows with Ctrl-w and then w. Resizing the width of a split window can be done with e.g. 10CTRL-w> or CTRL-w<. Close a split window with CTRL-w and press q. One can still open a new full window screen for editing with :e and followed by a tab, arrow keys to select the file, and enter. Personally, I prefer a full window screen.
Navigate between Tabs and split windows in Vim
How to use markdown in Vim?
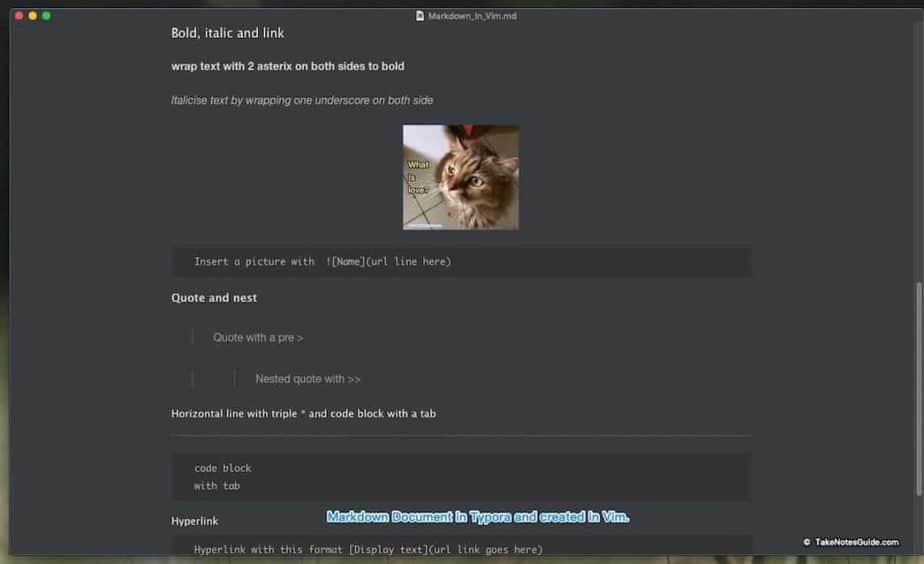
Once the document is saved in dot md or markdown extension, it should recognize markdown syntax. However, there is no live preview by default. Therefore, I would suggest writing in VIM in basic text or markdown and checking with an external app e.g. Typora before transferring out for further work. Vim is still excellent as a minimalistic word processing editor once you are familiar with basics. I have created this rudimentary markdown tutorial in Vim for new markdown basics users.
Markdown document created in Vim and viewed in Typora
This may be subjective to the person and his/her circumstances. But in general, Vim can be worthwhile to learn in terms of long-term productivity with its ease to launch and powerful editing features for those who have reasons to write by typing, edit files, and code on a continual basis, including and especially for complex needs. For example, a writer who wishes to recycle an old laptop for writing his novel in a dark theme, or a coder who needs a powerful editor to work, run, and search through multiple files and functions. Personally, it is also interesting to note that an old and free popular editor can still compare or even outshine modern IDEs and editors. For those still on the fence wondering how good or powerful Vim can be, just search YouTube for Vim tutorials and tricks. Vim is usable with basic knowledge but it can also be customized and refined to advanced usage according to the user’s capability. A pretty good Vim tutorial primer by Daniel Miessler can be all you need to learn and use Vim that covers both basics and advanced topics without overwhelming beginners (and yes it also covers creating shortcuts with remaps).
Why use Vim?
Firstly, it is small and fast. Whether in loading, usage, or quitting, it still can accomplish basic word processing and even set up advanced programming environments. It can be an excellent choice for those who need to get something done quickly or frequently. For example, a programmer may work on a few projects and need to set up the environment and launch the editor repeatedly to continue where he left off. Or someone who takes numerous breaks a day can launch Vim in seconds each time to keep working on his or her writing or other projects and even on a few computers, in which case Linux, vim, and git may be just what you need for speed and syncing as described in this post.
I also think Vim is good for general users to attain certain fast commands typing proficiency with mental focus and hand engagement; Vim usage may even be a good exercise for elderly folks to keep themselves mentally active.
VIM (created decades ago by Bram Moolenaar) was the most popular terminal editor there was since the UNIX days and is still popular with many who took the time to learn it. From what I read, it does take a steep learning curve but once familiar, users can stick with it for life is the impression.
I tried NeoVim and Micro Terminal Editor (popularly voted), but I choose Vim eventually to avoid expected quirks.
Benefits of using Vim
One can quickly edit files and documents with ease, even without much use of the mouse. Vim is designed in such a way that we can accomplish most or all commands and functionalities from the reach of our fingers on the keyboard. For example, :wq is a common task to write and quit and it is intuitively situated under our fingertips. Those who are starting out can begin to utilize Vim with just the bare basics.
Plus we can actually perform complicated and complex tasks with VIM as well, perhaps with the customization of keyboard mappings and automated scripts. Modern GUIs may be fanciful with colors and extensions, but how many can launch and perform tasks as fast as the decades-old GPL-compatible Vim?
How Vim can save time and improve productivity?
There will be releases of modern editors and IDEs, but should we need to learn these new software, shortcuts, and interfaces anew? With Vim fluency, there is hardly a need to engage in another steep learning curve for every single new editor software. If Vim already serves our needs and much more, then there is no need to chase to fix what’s not broken. And it is not like the free Vim software charges a yearly subscription fee to dissuade usage. Time and effort are not spent on extraneous learning in the sense that redundant future learning is saved.
On productivity, Vim is powerful. There are quite a number of advanced tips and tricks tutorials around to prove that. For example, one can format the whole document by typing a single-line command, change multiple file names quickly with few commands, spellchecks, names, and commands completion, or jump between different text in different files efficiently. Vim is like learning to bicycle or swim, one just has to learn it once well and there is probably no need to repeat the tedious learning.
The caveats can be the learning curve and the struggle to remember unused or complex commands over the months and years.
Note: Did you know that it is possible to format by reindenting the whole document e.g. Python/HTML with just gg=G? This is very useful to fix and clean up a long file of messy coding indentations. More explanation here, including how to create a shortcut key for it.
Why Vim for note-taking and writing?
It is perhaps the most common yet powerful editor across all major Unix-like operating systems; One can take notes on a UNIX, Linux, Mac OSX, and Windows (needs to be installed) at his convenience. Vim can be customized to one’s preference, for example with Goyo, a distraction-free writing environment. Also, counting words and characters in Vim can be displayed with commands or with a status bar plugin.
One can even use an old laptop with low-end specifications running on Linux to take notes and write a novel. The convenience afforded by Vim as a proficient word processor and even code editor proves that we can still work effectively without the latest and expensive computer system as long as we are comfortable or disciplined enough to use it.
Is there an alternative command line program for taking notes?
Other than Jedit, consider Jrnl (reviewed here) – a dedicated command line journal or note-taking program.
More Information
Is there a fun way to learn VIM?
Vim Master (more effective and challenging) and Vim Adventures may be enjoyable resources to learn Vim, but remember to practice and apply them otherwise, they are just useless knowledge.
And Vim Keyboard Sticker may accelerate your Vim keyboard shortcuts learning.
Is there a free resource for Vim developers?
Learn Vimscript the Hard Way is a free online resource that covers the vim basics, vim script language, and even up to vim plugin creation for distribution. Also, one may start with :help vim-script-intro.
More fonts for Vim?
Please install Powerline fonts accordingly from the terminal prompt. To use after installation, for example, from iTerm2 Menu -> Preferences -> Profiles -> Text to select the font.
How to comment in Vim with ease?
If you make lots of comments in different file formats, it may be worth your while to install the tComment plugin with this line:
Plugin ‘tomtom/tcomment_vim’
Restart vim and just use it by pressing gcc to insert a new comment syntax in Normal mode, or select the lines and press gc to make comments.
How to generate HTML and CSS boilerplate or basic templates?
If you are a developer who creates and modifies multiple HTML and CSS files on a regular basis or someone who just wants to avoid tedious or typo errors, then Emmet can be good labor and time-saver. Installing Emmet is just inserting the plugin line and installing as according to Vimawesome here (remember to restart your Vim after). Using Emmet can be just as simple as typing in an HTML document say, for example: !,, and enter (that means an exclamation mark followed by 2 commas without the colon and it will expand out to an HTML boilerplate). Not only this but there a quite a number of keyboard shortcuts for HTML, CSS, and XSL elements as well that you can refer to here.
Should I learn Emacs or Vim?
Emacs was also a popular terminal editor that can be extensive and from what I gathered, it seemed able to do everything from this application alone (in terms of basic computer functions). However, its drop in popularity and more arcane features compared to Vim can be a concern for the recommendation. It is worth mention users can get organized with notes and lists management with emacs org-mode, though arguably subjective to one’s opinion whether this justifies the effort to learn it. Please view a text editor voting poll here (the most popular applications/programs can mean a higher likelihood for and of community support and future developments).
How big is the vim file?
$ du -h /usr/bin/vim
1.1M /usr/bin/vim
It is only about 1.1Mb according to du, so it is really light compared to some modern GUI editors e.g Visual Studio Code is ~73.9Mb last checked. That also means that vim loads pretty fast as well, literally it should load in seconds or less and is productive for writing, note-taking, and even coding.
How to change the sound of the Mac terminal?
If you like to change the harsh Mac terminal default alert sound, go to System preference -> Sound -> Sound Effects and choose the one you like before closing.
How to sync my notes from iPhone to Mac?
Apple notes, Evernote, and Google Keep apps can be some of the easiest ways to sync your notes between iPhone and Mac. For command-line users syncing their notes between different Windows, Mac, and Linux systems, vim and git can be a fast and effective way to accomplish this.
Is Vim difficult?
For starters, it can be, especially when one learns from an unsuitable resource that mismatches his/her skill level. I personally find that many plugins usage descriptions should be clearer and concisely tell or show users how to use it in the beginning. Also, for example, you may find repeated mentions of the leader key, which is actually by default the ‘\’ key, in combination with another. However, the basics are not too tough at all once grasped.
Acknowledgments: I have learned from Stackoverflow and customized the TNG theme, thanks to other plugins authors including Startify, Goyo, and Vim-airline.


")


